Testing the Google Vision API

Last month I found an interesting Google Cloud Platform blog post, announcing that the Cloud Vision API is entering a public beta phase.
From the post:
Now anyone can submit their images to the Cloud Vision API to understand the contents of those images from detecting everyday objects (for example, “sports car”, “sushi”, or “eagle”) to reading text within the image or identifying product logos.
Having experimented with OCR using libraries like Tesseract (with varying degrees of success) I was eager to try out this new tool, and I set out to build an app to test it’s usability and accuracy.
Appcelerator Titanium
I spent some time exploring different platforms for my test app, and decided that because the app will require direct access to hardware API’s, an Android app would be the best way to go.
I have some experience with the Appcelerator platform, and although it can be difficult to set up and configure properly, it is great for prototyping mobile apps. I can write the app code in JavaScript, and still create native UI components. I can then deploy the app across different mobile platforms (iOS, Android, Windows Phone) with little modification.
In this case the pros outweighed the cons, and I decided to go with Appcelerator for this project.
Getting Started
I needed to create a Google Cloud Platform account in order to get a token and manage access to individual API’s. While Vision is a paid service, there is a free tier which includes your first 1000 requests per month for each detection type. This usage limit is more than enough for testing purposes.
Create a Sample App
I had already installed the latest Appcelerator tools for a previous project, so I got started by creating a new Titanium Alloy app. I’m not going to go into too much detail about Titanium/Alloy here, but the Quick start guide is a great source of information on how to start your first project.
The Alloy project skeleton is created with a view (index.xml) and a controller (index.js).
In the view I create a simple interface for the app. A button to open the photo gallery so we can select an image to analyze, and a label to hold the data we get back from our api request.
The controller will contain event handlers for out interface, and the app logic required to make the actual request to the Vision API.
#views/index.xml

<Button id="btn_gallery" onClick="showGallery">
  Photo Gallery
</Button>

<Label id="lbl_labelsText"></Label>
#controllers/index.js

function showGallery()
{
    Ti.Media.openPhotoGallery({
        ....
        success: photoCallback
    });
}
Encode the Image
The photoCallback function will be passed a CameraMediaItemType object. From this object, we can get the image as a Ti.Blob.
Vision expects the image to be Base64 encoded, so I used the Titanium base64encode utility to encode it.
#views/index.js

function photoCallback(cameraMediaItem)
{
    var image = cameraMediaItem.media;
    var encodedImage = Ti.Utils.base64encode(image);
}
Choose a detection type
Now that I’ve selected an image and properly encoded it, I am ready to build a request and send it to Vision.
#controllers/index.js

function photoCallback(cameraMediaItem)
{

    var image = cameraMediaItem.media;
    var encodedImage = Ti.Utils.base64encode(image);

    //create the object to send
    var request = {
        "requests":[
          {
            "image":{
              "content": image
            },
            "features":[
                 {
                  "type":"LABEL_DETECTION",
                  "maxResults":5
                }
            ]
          }
        ]
    };
}
In this example I have requested LABEL_DETECTION on the image. It is possible to request more than one type of detection by adding objects to the “features” array.
The available detection types are:
FACE_DETECTION
TEXT_DETECTION
LANDMARK_DETECTION
LABEL_DETECTION
LOGO_DETECTION
SAFE_SEARCH_DETECTION
IMAGE_PROPERTIES
Next, I go ahead and make the request
#controllers/index.js

var apikey = 'YOUR_GOOGLE_KEY_HERE';
var xhr = Ti.Network.createHTTPClient();

xhr.onload = function(e)
{

  var response = JSON.parse(e.source.responseText);

  if('labelAnnotations' in response.responses[0]){
   var labels = response.responses[0].labelAnnotations;

   var description = '';
   labels.forEach(function(label, index, labels){
     description += label.description + ' ';
   });

   //Set label text to show return data in app
   $.lbl_labelsText.setText(description);

  }
}

xhr.onerror = function(err)
{

  //Alert the error message
  alert(e.source.responseText);

}

xhr.open('POST','https://vision.googleapis.com/v1/images:annotate?key=' + apikey);

xhr.setRequestHeader("Content-Type", "application/json");

xhr.send(JSON.stringify(request));
The onload handler takes the return data and checks to see if there are any “labelAnnotations” in it. If there are, it will concatenate them and display them on the screen.
If I add any other types of detection, the results will be in different “typeAnnotations” objects. Eg. “textAnnotations” for TEXT_DETECTION, “faceAnnotations” for FACE_DETECTION, and so on…
Results
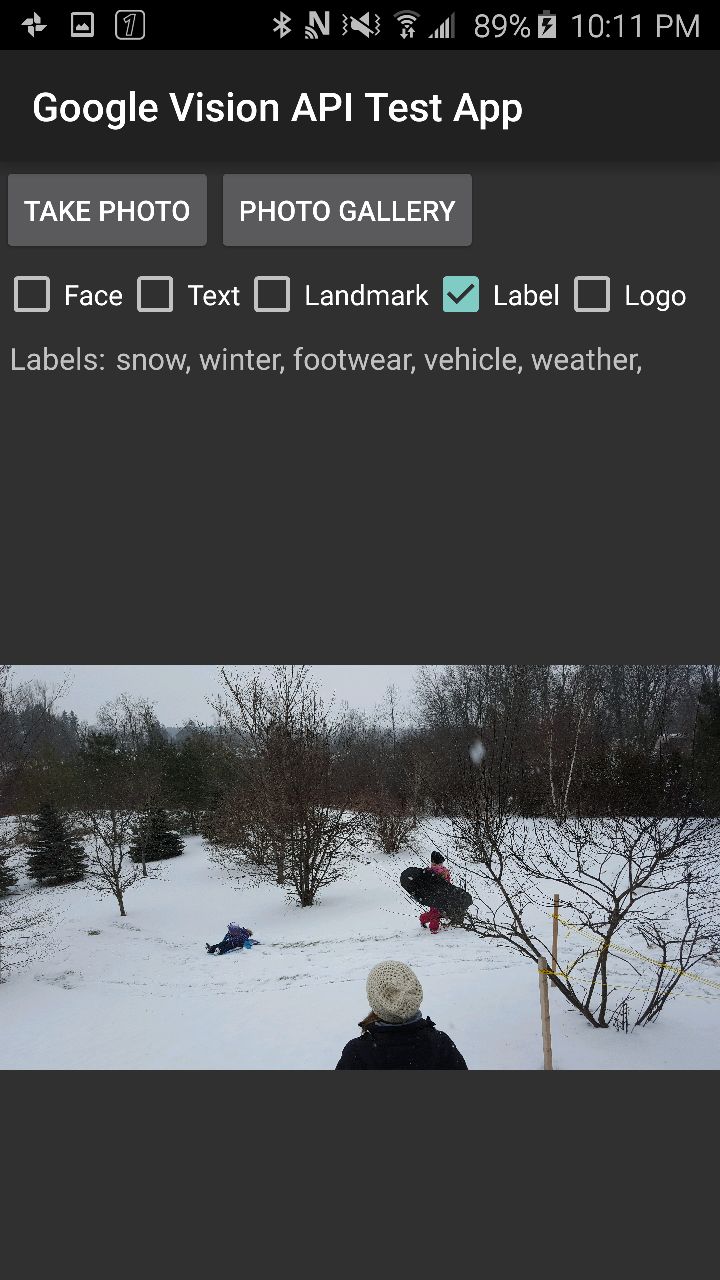
Now I am ready to build and run the app. I start it up and select and image from the gallery on my device. The app sends the request and produces the following output on screen:

As you can see, Vision has returned an accurate list of labels describing what is in the photo.
Conclusion
I analyzed dozens of images using this app and the results were very impressive. Label detection is quite accurate. Every few tries there would be a label in the list that didn’t make sense, but mostly the tags returned were relevant.
The most impressive detection type is TEXT_DETECTION. As I wrote at the beginning of this post, I have experimented with OCR in the past and the results were mostly poor. I would spend hours tweaking settings and modifying images to be able to pull out a few readable characters. Vision is extremely accurate by comparison. I analyzed receipts and business cards, and I was able to get almost all of the text from them. Logo text or words printed in a fancy font would sometimes come back jumbled, but symbols, phone numbers, and email addresses almost always came back in tact.
The FACE_DETECTION type is the most interesting, It returns data about the location of facial landmarks and tries to assess the subjects mood. There is a lot to cover so I will dedicate a future post to it.
Vision is by far the best image analysis tool I have used, and definitely worth testing.
